Super Power Words

Now that Henry has started school properly, he is learning to read, and each week he gets sent home with three “super power words” to learn. Back in 2020, when Owen was in reception, he had the same words to learn, except we were teaching him at home. At the time, I thought it would be cool to have an iPad app for Owen to practice on, but I did not have the skills to knock one up quickly, nor the time to learn. Fast forward three years, to when Henry is learning to read, and I am working as a software developer full time, and it is the sort of thing I can knock up in an evening after the boys have gone to bed. So I did – as soon as Henry came home with his first set of super power words!

I used Create React App to bootstrap a basic application, as Next.js would be overkill for something so simple. Then it was just a case of adding a function to randomly display the words, and a click handler to call it. Initially, I hardcoded the words, to get to a “minimum viable product”, where testing showed I needed to add some more logic to prevent the same word being shown twice in a row. The plan was always to share it on my GitHub, so I changed it to read a list of comma-separated words from environment variables, and whilst there added the option to change the heading to make the app usable for other people.

The “user acceptance testing” (showing it to Henry) identified that the words needed to be all in lowercase, except “I”, and that the “a” character was not displayed as taught at school, so I figured that teaching a four-year-old to read was one of the few valid use cases for the “Comic Sans MS” font and switched to that.

To get the app onto Henry’s iPad, as he does not like laptops, I used AWS Amplify, which combines a basic CICD pipeline and serverless hosting, for a cheap hosting solution for simple web apps. I was also able to hook it up to Henry’s domain name. Builds are triggered by pushing app changes to the main branch of the GitHub repository for the project. When Henry gets a new set of words it is just a case of updating the environment variables in the Amplify web console and re-running the latest build.

If you want to try for yourself, you can check out (or fork!) the repository, create a .env file, set your environment variables and run “npm start”. Or simply have a look at www.henrycraik.co.uk.

Thirty Days of JavaScript – Update

I have failed in my challenge to complete Thirty Days of JavaScript in April. I got off to a strong start, completing twelve of the challenges in thirteen days, but then life got in the way – some other things cropped up and it got shuffled down the priority list for what seems to be my ever decreasing amount of free time after the boys have gone to bed.

I enjoyed getting my teeth back into JavaScript, my favourite daily assignment was the video player on day eleven, shown above, where I had to add the video control elements and link them to the JavaScript video player control methods. Not only was it a fun task, but I was able to complete large parts of it myself without needing to watch the course notes to figure out the correct techniques. It really felt like I had made good progress.

The lesson I felt that I struggled with the most was the “Array Cardio” on day four. I was not familiar with the various methods to manipulate data in arrays, so this is one part of the challenge that I will be revisiting when I have completed the other tasks. The reason I decided to tackle the thirty days of JavaScript was to improve my skills – identifying areas that need more work is a key part of this, so am taking it as a positive.

After mentioning in my original post how much I appreciated the debugging setup in VSCode I have not been able to get it working again. I think either Chrome or a VSCode extension has updated. Whilst I was focused on “must complete a task each day” I was not able to fully investigate it. I have a good workflow going with Microsoft’s Edge browser, but it would be easier to have console output straight into VSCode again – something else to investigate.

I have really enjoyed the tasks, and definitely feel like my JavaScript skills are improving, so I am committed to completing the challenge. Whilst I would like to say that I will finish the thirty days of JavaScript in the next few weeks, I need to be realistic and balance it with my other commitments. That said, I am going to aim for three episodes a week, then revisiting the areas I have struggled with There is also a little JavaScript project that I have been meaning to do for a few years, so I will do that as a little end of course assignment.

Thirty Days of JavaScript

JavaScript, alongside HTML and CSS is one of the three legs of web development. HTML defines the content, CSS the styling/layout and JavaScript defines the behaviour of a webpage. Recently I have realised that my web development tripod is a bit wonky. I studied JavaScript at university, I have barely used it since, only occasionally in frameworks, such as Bootstrap. I also used Flash ActionScript, which is a similar language, in my day job developing automotive touch screen interfaces, but even that was ten years ago. Instead I have kept all the logic of my websites server side, using PHP to control the behaviour, which is still a valid way of doing things, but I should not be relying on it.

JavaScript has evolved since I used it – frameworks such, as Vue and React, have become the mainstay, the “ES6” has come along – replacing “var” with “let” or “const”, and you can even run it server side with Node.js. JSON (JavaScript Object Notation) also seems to have largely replaced XML. Basically JavaScript has matured and seems to be here to stay! Therefore I decided it was about time brush up my skills. Before I tackle frameworks I wanted to get get the basics right, and refresh my vanilla JavaScript knowledge. Whilst looking for inspiration I came across 30 days of JavaScript, which seemed to be pitched at my level – knowing the basics, but needing to improve. I learn best by working on projects, so the thought of thirty small projects to work on really appealed to me.

You may be able to tell from recent posts (HKT Winter Defiance Handbook and Godiva Trail Riders Lockdown Challenge) that I like to set myself a challenge. So as April has thirty days, and there are thirty exercises, I am going to try to get them all done in April! I am aiming for one per day, but I may have to catch up/get ahead of myself depending on other commitments. I will post again at the end of the month, with my progress, what I have learned and which exercises have been my favourite.

I have completed the first challenge, the JavaScript drum kit at the top of the page. The content and structure were cloned from GitHub and the challenge/tutorial was write the JavaScript to capture the keyboard presses and assign them to the corresponding sound file, then play it and add the animation. It was definitely at the right sort of level for me, I needed to look up a couple of things to understand what they were doing, but learning is the main goal behind this challenge. Possibly the hardest thing was getting my Visual Studio Code set up for debugging JavaScript – switching to Chrome, after reading this guide, seemed to do the job. Hopefully over the course of the month I will be able to see if I can get debugging working in Firefox or even Edge.

Twitter Bot

Writing a Twitter bot has been one of those projects that I have wanted to do for years, but I had not had an idea for what the bot should do. Then I was sent a link to onewayroadtobeer.com and I thought I could do a countdown to what I am most looking forward to after lockdown ends – riding bikes with my friends!

The next step of the plan was easy, as an AWS Certified Cloud Practitioner I knew that Lambda is the right environment for running a small task once a day. In my previous Lambda projects, such as Automatically Deploying Website from Git to AWS S3, I have used the Python programming language, so opted for that again. From there it did not take me long to find Dylan Castillo’s excellent tutorial and GitHub repository for a Python Twitter bot on AWS Lambda. If anything it was too helpful, but it did force me to try writing the Python code on my Mac, rather than direct into the Lambda console on AWS, as I had done previously. This made it much easier to test/debug my changes to the code.

The changes were pretty minimal, instead of pulling the tweet from a file, the get_tweet function, compares the current date to the lifting of restrictions as defined in the government’s “Roadmap out of lockdown”, which I have hard coded for now. Hopefully the goalposts will not be moved too much! After a small tweak to change “in 1 day we will be able…” to “tomorrow we will be able…” the bot was ready to deploy. So far it has been tweeting out its daily message at 9:00 each morning, giving me a sense of pride whenever I see it in my Twitter feed. As well as building up the excitement for being able to ride with my friends – only 14 days to go!!!

You can follow the bot at @untilweride and if you are not already following me, my organic tweets are at @lewiscraik. If you want to to deploy a bot of your own, my project is on GitHub.

When Did You Last Check Your Passwords?

I like to think of myself as web savvy and security conscious, but I had a bit of a shock this morning! The new iOS 14 passwords feature was mentioned in the group chat I have with my friends from school, and I when I checked my iPhone, I discovered that I had 373 “Security risks” identified with my passwords! Certainly not a time to be proud of getting a higher “score” than my friends… As if that was not bad enough, clicking through showed that these were not just obscure sites – it was my email/bank account/Facebook/Twitter etc. Fortunately all of these have Multi Factor Authentication (MFA) configured, so not a major issue, but still concerning.

Before you carry on reading this post, if you have not already enabled MFA on your Apple/Google/Email/social media/banking accounts, please do it now – that way your data will be significantly more secure if your password is leaked.

If you have a device running iOS 14, you can check your passwords by going to Settings > Passwords > Security Recommendations. If you do not have an iOS device, you can use the Have I Been Pwned service and enter your email address(es) to check if you are affected by any leaks. However this only checks email addresses, rather than login details and passwords together, like iOS does.

Running my email addresses through Have I Been Pwned, four out of five of them have got leak passwords associated with them. A couple were from older well known leaks – MySpace/Adobe/Dropbox/LinkedIn etc, but also newer leaks collated from username/password combinations on hacker sites. These credential lists are likely to be used by hackers to access accounts hoping that you use the same username and password.

Apple collates the “high priority” issues at the top of the list, so this evening I have been working through these, changing the passwords on the key sites, using the complex and unique passwords suggested by the Apple Keychain feature. For me, the bulk of the “compromised” passwords are old accounts where I have reused the same password, so will attack these a couple at a time changing them with Apple Keychain, or simply closing the accounts if possible.

Interestingly at least one password that has been compromised is unique, from a site which does not seem to have been hacked. However, they did not use HTTPS until fairly recently – I can only assume that my password was sniffed on a public network. This is a good reminder to look out for the padlock when you log in anywhere online, or to use a VPN service – I use Windscribe if I am connecting my phone or laptop to an unfamiliar network.

Hopefully this post has prompted you to have a think about your online security and take the time to audit your passwords. It may be boring, but better to do it proactively than have to deal with a scammer accessing your accounts.

CotEditor Is the Mac Equivalent of Notepad++ That I Have Been Searching For

I have been a Mac guy for years, since I bought a second hand iBook G3 as a student. However there has been one application that I missed from my time using Windows – Notepad++, a simple text editor with code highlighting. The fact that I use it almost daily on my work PC just rubs salt into the wound.

Searching for “a Mac equivalent to Notepadd++” usually ends up pointing to more fully featured text editors, such as Atom. Atom is great, especially when working on a project with multiple files and using git. Atom is where I do most of my coding, but it is slow to load, especially on my ageing iMac. Often I just want to quickly edit a config file, or grab a snippet of code, so I would either wait for Atom to load, or simply use “TextEdit” or even “Nano” in the terminal. However these do not have basic developer features like code highlighting. Which is why I find often found myself looking for that perfect lightweight code editor for Mac.

Then after reading the same lists of fully featured editors, I saw a mention of CotEditor on Reddit and it seemed to meet all of my requirements – it is a native Mac app, designed for speed and was also free! It seems to still be under development, with a repository on Github, and is distributed through the Mac App Store – giving peace of mind that Apple have checked it over.

I have now been using CotEditor for a few weeks and I even prefer it to Notepad++ on my work PC. The design feels more user friendly, despite being simpler and it always seems to open quickly when needed. It just does the job it is meant to do really well, without any unnecessary bells and whistles. I am really surprised that it is not more widely used, so hopefully this post will be found by anyone looking for a lightweight, fast code editor for the Mac, that works like Notepad++ on the PC, and more people will learn about this great app.

Automatically Deploying Website from Git to AWS S3

I am a big fan of Amazon AWS – this blog has been running on it for a few years now. Since moving to AWS S3 (for storage) and CloudFront (as a Content Delivery Network) to host static websites, such as my homepage, I have been trying to work out how to get them to automatically deploy when I update the Git repository I use to manage the source code. I looked in to it in some detail last year and concluded that AWS CodePipeline would get me close, but would require a workaround as it did not support deploying to S3. In the end I decided that a custom AWS Lambda function was needed.

Lambda is a service that hosts your code, in a state where it is ready to run when triggered, without needing to have a server. You are only billed for the time your code is running (above a free threshold), so it is perfect for small infrequent jobs, such as deploying changes to a website or even using it with Alexa for home automation. It seemed like an interesting area to explore and gain some knowledge, but I think I went in at the deep end, trying to develop a complex function, using an unfamiliar language (Node.js) on an unfamiliar platform. Then other tasks popped up and it fell by the wayside.

Then earlier this year I saw an announcement from AWS that CodePipeline would now support deploying to S3 and thought my problem had been solved. Although I must admit that I was a bit disappointed not to have the challenge to code it myself. Fast forward a few months and I had the opportunity to set up the CodePipeline, which was very easy. However, it only supported copying the code from the Git repository to the S3 bucket. It did not refresh Cloudfront, so my problem remained unsolved.

The CodePipeline did allow for an extra step to be added at the end of the process, which could be a Lambda function, so I went off in search of a Lambda function to trigger an invalidation on CloudFront when an S3 bucket has been updated. The first result I found was a blog post by Miguel Ángel Nieto, which explained the process well, but was designed to work for one S3 bucket and one CloudFront distribution. As I have multiple websites, I wanted a solution that I could deploy once, and use for all websites, so my search continued. Next I came across a blog post by Yago Nobre, which looked to do exactly what I needed. Except that I could not get the source code to work. I tried debugging it for a while, but was not making much progress. It did give me an understanding of how to link a bucket to a CloudFront distribution, trigger the Lambda function from the bucket and use the Boto3 AWS SDK for Python to extract the bucket ID and CloudFront distribution from the triggering bucket – all the things that were lacking from the first blog post/sample code. Fortunately both were written in Python, using the Boto3 AWS SDK, so I was able to start work on merging them.

I was not terribly familiar with the Python language, to the point of having to search how to make comments in the code, but I saw it as a good learning experience. What I actually found harder than the new-to-me language, was coding in the Lambda Management Console, which I had to do, due to both the inputs and outputs for the function being other AWS features, meaning I could not develop locally on my Mac. Discovering the CloudWatch logs console did make things easier, as I could use the print() function to check values of variables at various stages of the function running and work out where problems were. The comprehensive AWS documentation, particularly the Python Code Samples for S3 were also helpful. Another slight difficulty I experienced was the short delay between the bucket being updated and the Lambda function triggering, it was only a few minutes, but enough to add some confusion to the process.

Eventually I got to a point where adding or removing a file on an S3 bucket, would trigger an invalidation in the correct CloudFront distribution. In the end I did not need to link it to the end of the CodePipeline, as the Lambda function is triggered by the update to the S3 bucket (which itself is done by CodePipeline). All that was left to do was to tidy up the code, write some documentation, and share it on Github for anyone to use or modify. I have kept this post more about the backgound to this project, the code, and instructions to use it are all on Github.

This code probably only saves a few minutes each time I update one of my websites, and may take a number of years to cancel out the time I spent working on it. Even more if I factor in the time spent on the original version prior to the CodePipeline to S3 announcement, but I find coding so much more rewarding when you are solving an actual problem. I also feel like I have levelled up as a geek, by publishing my first repository on Github. Now with this little project out of the way, I can start work on a new server, and WordPress theme for this blog, which was one of my goals for 2019.

Apple Watch Series 3 – Long Term Review

Jen bought me an Apple Watch for my birthday a few years ago. I have been meaning to write a short review for a while now, as today is the fourth anniversary of the original model being launched I thought it was a good day to publish it! I always prefer reading these long term reviews, to the usual short preview as a product is launched. I’m not a professional technology review, just a geek with a blog, so for a really detailed look check out DC Rainmaker’s review.

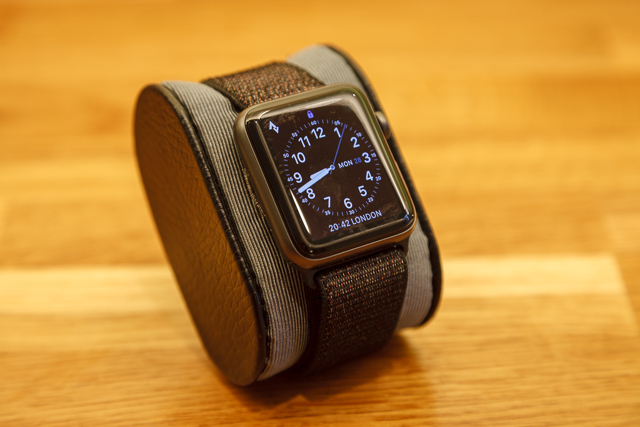
My watch is a non-cellular 42mm Apple Watch Series 3 in space grey, it came with a grey sport band. When Jen took me to the Apple Store, to refine the Apple Watch hints I’d dropped, I couldn’t get on with the sport band at all, so I told Jen I wasn’t fussed between the black or grey, as I planned to replace it straight away. However once I had the watch I quickly got used to the strap and probably would have preferred the black sports band. I have since bought a black sport loop – which has become my main strap, unless I am swimming, out in the rain or dealing with Henry, who is sicking up a lot of milk at the moment.

I had considered the cellular versions of the watch, but I didn’t think it would be worth the extra cost, both the purchase cost and the £5 per month service charge. I also actually prefer the look of the watch without the red dot on the crown, which signifies the cellular versions. The Apple Watch 4 solution of just a red ring looks a lot nearer. It is just a shame that the sport loop wasn’t available with the basic watch, only the cellular version, again this has been remedied with the new version – kudos to Apple for sorting these niggles.

When the original Apple Watch was announced, I wasn’t interested in it at all. I had (and still have) a couple of nice automatic watches and a Casio G-Shock, for when a more rugged watch was needed. Even though I considered myself more of a geek than a watch guy, I couldn’t see me wearing an Apple Watch rather than my other watches. Although I did appreciate some of the details and nods to traditional watches on the Apple Watch.

Fast forward a few years, Owen had been born, Jen was looking to get her fitness back and Apple had added GPS to the Series 2 Apple Watch, making it a much better prospect for a fitness watch. In addition to the fitness features I could see that having iPhone notifications on her wrist would be handy whilst wrangling a now wriggling Owen. So I took a flyer and bought Jen an Apple Watch Series 2 for her birthday. Much like when I’d bought her an iPad a few years before, it quickly became an essential device. This was very apparent when Jen forgot her watch charger when we went to Croyde and we had to ask her parents to bring it down when they joined us.

Shortly after Apple announced the Series 3 Apple Watch, now with a barometric altimeter, I was noticing some strange height results on my Strava. Things like gaining more altitude on short local rides, than when I’d been slogging uphill on longer rides at trail centres. This combined with seeing how useful Jen was finding her watch made me reconsider my view, so I started dropping hints for my birthday.

The fitness features, especially Strava, were my main reason for wanting an Apple Watch and I can safely say that my expectations were blown away! I would have been happy just using it with Strava to record my bike rides, but it is the off the bike fitness where it excels. The “three rings” concept, really encourages you to hit three different fitness goals each day – stand for at least a minute in an hour for twelve hours of the day, do at least thirty minutes of exercise and burn a predetermined number of calories (400 for me) by moving around. These daily goals are backed up with awards things like hitting goals on consecutive days, or doubling the move calorie targets. These targets are especially addictive, on more than one occasion I have found myself doing press ups before bed to continue a move streak, or getting up and going for a walk when the Watch reminds me that I’ve been sitting down for too long. I have however noticed oven the last six months or so that it has become a lot easier to hit my 400 calorie target – my Apple Watch wearing friends have also experienced this. I like to think we are getting fitter, or moving around more, but I expect that someone at Apple has modified the code.

I also use my Watch to track my sleep, it mostly confirms what I already knew, I’m a deep sleeper, but could do with going to bed a wee bit earlier. I also like the “Breathe” feature, although it always seems to prompt me to breathe worst moment. I don’t know what, if any, logic is behind these alerts.

The Watch includes a heart rate sensor, which has opened up a whole new load of data for me, especially during bike rides. On the other hand, too much data can be a bad thing! On a few occasions I have woken up to an alert on my Watch telling me it detected an abnormally high heart rate whilst I was asleep. This has led to various medical checks, none of which have found anything. So either there is a problem with the heart rate sensor on my Watch, or I have a rare/very occasional heart problem. I ordered a Wahoo Tickr heart rate monitor, which is on a chest strap, to help me rule out any problems with the Watch, but of course the issue has not reoccured. I now use the Tickr paired to my Watch to monitor heart rate on longer bike rides, as chest straps are meant to me more accurate than the optical sensors as used on the Watch.

Aside from fitness tracking I also use my Watch to preview notifications from my iPhone. I find it much easier to glance at my wrist to see a snippet of information, rather than taking my iPhone out of my pocket. Notifications from Apple apps, such as iMessages or email work great, you can usually see what the control the message is and give a brief response. However third party apps are a bit more hit and miss. For basic Siri tasks, such as setting a timer, it is much easier to use the Watch. I also find it useful on the bike, where I would usually need to remove my gloves to use my iPhone, I can send messages or even make and receive phone calls using Siri, whilst riding along! And Apple Pay – I doubt I will ever tire of being able to pay for things with my Watch.

The way the Watch and the iPhone hand off notifications to each other works seamlessly, which is actually frustrating for me as an owner of multiple Apple devices – if my Watch and iPhone can work that closely together why do I still get so many duplicated alerts on my Macs? Hopefully this is something Apple will work on in the future.

The only other problem I have with the Apple Watch is that I hardly ever wear my other watches these days. The Apple Watch integrates with my life so well that my mechanical watches rarely get worn. Sometimes I wonder if the stand goal is really to make sure that you are wearing your Apple Watch for at least twelve hours a day, rather than any other watch… I occasionally force myself to wear my mechanical watches, usually on special occasions and still love the amazing detail in the mechanisms, but I have been caught out trying to pay for shopping with them. The watch that has suffered the most is my G-Shock 5600, it used to be my daily watch, the only watch I would take when travelling etc but is neither as useful as the Apple Watch, nor as special as my technical watches. As I was writing this blog I took it out of my watch box and realised the battery was showing “low”, in the years I wore it was always on “high”, fortunately a few days on the windowsill recharged the battery for another few years.

On the subject of charging, when I first got the Apple Watch I charged it overnight, every night. If I forgot I could get two days use from one charge. These days I charge the Watch while I am getting changed, or having a shower – as it is only a small battery, it does not take long to charge at all.

To conclude, out of all the gadgets I have owned the Apple Watch fitted in to my life and made itself an essential item for me quicker than anything else. If I broke/lost it I would replace it without a doubt. It also makes me wonder what will happen to the luxury watch industry. I am usually a big fan of heritage and simplicity, but am now rarely found without my Apple Watch on my wrist.

My Backup Routine 2019

Modern life produces a lot of electronic data, especially when you are involved in digital photography and software development. A lot of that data is irreplaceable, so backups are something that I take fairly seriously. Recently the main hard drive in my iMac had a bit of a wobble, indicating a failure is likely. This shouldn’t really surprise me as the iMac is eight years old, however it was a good reminder to review my backup routine. As I have enjoyed reading similar posts, I thought I would share my routine, hopefully to inspire and/or help people to backup their data.

My theory with backups is that they should be as simple and automated as possible, that one back up is not enough and one should be kept in a physically separate location to the main data. When there is a large amount of data to backup the first and last requirements contradict each other. A few years ago I tried an automated online backup service, but it would take days to backup a memory cards worth of photos. So now I tend to split my backups into two – one to save me from my own stupidity (deleting the wrong file etc) or a simple hardware failure, these can be automated and a second to protect from flood/fire/theft etc, which is kept offsite, but is a manual process.

I have four main sets of data to back up:

  1. The data on my iMac, this is all of my photography and software development work and is stored on the internal 500GB hard drive. There are bits in the cloud, for example iCloud or GitHub, but I do not really consider this a backup.
  2. My archive data, things that have ben deleted from my iMac, such as photos that did not quite make the grade, or back ups of my Lightroom catalogs.
  3. The data on my MacBook. Day to day my MacBook is used for general browsing/email etc, so anything I lost would be in the cloud. However, when I am travelling it is my main machine.
  4. My iPhone, aside from work, everything is on the small device in my pocket!

iMac Backups

My main backup for the iMac uses Apple’s Time Machine software to save my data to a G-Technology hard drive, which is permanently attached to my iMac. Data is copied hourly and automatically managed to keep a balance between frequency of data saved and how long you are able to rewind. It is ideal for when you delete the wrong file etc. However being permanently attached to my iMac means I need a second backup. After much deliberation and experimentation I settled on using another external hard drive, this time a LaCie Rugged, which is kept away from my house – I only bring it back to connect to the iMac to run backups. I use the CCCloner software, which makes a clone of the internal hard drive, rather than the versioned backup from Time Machine. An added bonus is that if my iMac were to get stolen I could plug the backup drive into another Mac and have my own system ready to use. As I need to physically carry the hard drive to my office, this backup is not automated, so I have set CCCloner to nag me that it has not seen the external hard drive in a week.

Archive Backups

I also use CCCloner and another LaCie Rugged drive to back up my archive data. Once the backup hard drive is plugged into the iMac CCCloner takes over and copies the data, ejecting the drive when it is finished. Whilst reviewing my backup strategy I decided that I should look at options for a secondary backup, previously I had not deemed this data important enough, however storage has become cheaper. I will blog about my findings soon.

MacBook/Travel Backups

For fifty weeks of the year I could probably get away without backing up the data on my MacBook, everything is in the cloud. However, the MacBook is the computer I take if I am travelling, which is probably the most likely time for equipment get lost, damaged or stolen.  When I am travelling the key data for me to backup is photographs. At the earliest opportunity I download my memory cards to Lightroom on my MacBook – keeping the files on the memory card. As soon as the download has finished I connecter yet another LaCie Rugged drive to the MacBook and let Time Machine copy the files over. That gives me three copies of the data. Whilst Time Machine is running, I look over the photos in Lightroom, process some and if I have wifi available save any important photos to the cloud, giving me a fourth copy. I always try to keep the laptop and external drive in separate bags, for example laptop in hand luggage and external drive in checked luggage when flying. There is no point having multiple copies of data if they are in the same bag that gets stolen!

iPhone Backups

There are two main ways to back up an iPhone – I use both! Whenever my iPhone is connected to a wifi network and charging it backs up to iCloud. As I have a lot of data on my phone I have had to pay for extra iCloud storage, but at 79p per month is cheap for seamless backups. Whenever I sit at my iMac I always plug my iPhone in, so that it performs a sync with iTunes. I have chosen “Encrypt iPhone backup” option to ensure that passwords and my health data is saved. Of course, this iTunes backup on my iMac then goes in to the iMac backup above.

This system works well for me, although there is some room for improvement, especially in automating off site backups. The key thing is that if my iMac died or was stolen I am confident that I could be up and running again with all my data intact.

Google Authenticator – How to Backup for Moving to a New Device

Recently I’ve had to start using two factor authentication (2FA), both for my AWS account and Bitcoin wallets. It seemed like there were two main options for apps to run this, Google Authenticator and Authy. Initially Authy looked like a good bet, it could sync across multiple devices, including smart watches, but it turns out this convenience means the security is weakened – to the point that Coinbase advised users not to use it! Google Authenticator goes the other way, it is extremely secure, but if you lose/reset your device the settings, and potentially access to your accounts are lost.

The only way to avoid this situation is to make a backup of your access codes at the time you add them to Authenticator. You can either do this by writing down the seed key, or taking a screenshot of the QR code. It is not advisable to keep these backups with your phone or readily accessible on an online computer, as this is one of the keys to your account. I prefer to print off a couple of copies, write – with a pen, which account the QR code is for and file them away separately. I also keep another copy on an encrypted memory stick. If you are using 2FA to access an online account and have not backed up your access codes – you should do it now!!!

When you get a new device, or wipe your existing device, it is just a case of re-scanning the QR code into Google Authenticator from your backup. You can test your backups by scanning them into Authenticator again, either on your existing device or a separate one – they will give the same six digit code as the original. To test that nothing was linked to my iPhone I also installed Authenticator on my old iPhone and was able to log into my AWS account – AWS is ideal for testing 2FA, as you can create a dummy account with 2FA enabled, without running the risk of losing access to your main account.