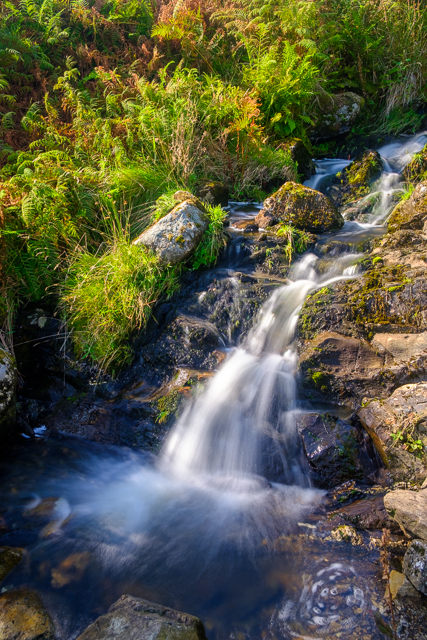
This was a two-second exposure, with a neutral density filter and a circular polarising filter to extend the shutter time and control reflections, taken on my Fuji X-T2 with the 18-55mm “kit” lens.
Since photographing the British Downhill Series last year, I have wanted to shoot another downhill race – so where better to start than my local race series, on the Stile Cop downhill trails at Cannock Chase. Despite riding at Cannock Chase a fair bit, I had never ventured over to the downhill trails, so I was a bit surprised to find out that the entrance was at the top of the hill. I got there just before the first, of two, race runs were about to start and made my way down the trail until I found a good spot, and bumped into Sean from Little Rippers, who had found a good spot by a jump.
I could not make that angle work, partly because I was lower than the riders coming through, and the wide-angle lens on my Fuji X-T2 was struggling to focus. During a break in the racing, I crossed the track, found a better viewpoint above a switchback corner, switched to my telephoto lens and was getting some better images.
I then noticed a better position to shoot the jump I had started at, so walked down the track to that. The angles didn’t quite work for the jump, but I could get a nice clean shot of the riders coming down the chute after the jump, so stuck there until the end of the first runs. The weather was overcast, which was both a blessing and a curse, it meant that there were no strange shadows to deal with, but also that it was pretty dark in the trees. With lots of riders coming straight towards me, I took the opportunity to experiment with some of the different focus modes on my camera but came to the conclusion that placing the smallest focus point where I wanted the rider’s face to be in the frame, then tracking them was getting better results than any of the more “intelligent” focus modes. This is the method I have been using since my motorsport photography days (fifteen years ago!), however, I would like to try the new bicycle tracking mode on the latest Fuji cameras though.
After lunch it seemed like everybody went back up to the top of the hill, so I joined them. This was a bit of a rookie error – as I was the only photographer to do this. All the others seemed to have shot the first race runs from the bottom of the hill, and then come up the hill and got themselves set up with good viewpoints for the second runs. I considered going to the bottom of the hill, but took the lazy option and returned to the switchback I had shot earlier in the day. Lesson learned for next time though!
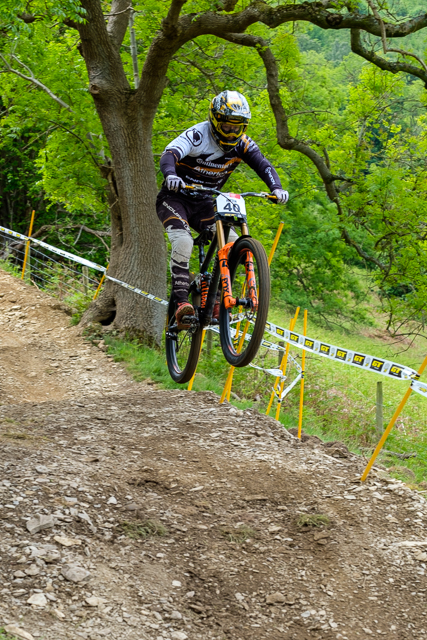
Concentrating on one corner was a good exercise in getting the best angle and in the end I managed to settle on a “BOGOF” angle – capturing a full rider shot exiting the previous corner (photo above) and then a much tighter image of the rider going through the corner in front of me (photo at the top of this post). I would not normally go for such tightly cropped action images, but I liked how I was able to capture the rider’s expression, even behind a full-face helmet and goggles.
Even though it was “only” a local race, the standard of riding was high – the elite riders looked particularly fast, pedalling everywhere they could, rather than solely relying on gravity. There was also a surprisingly big crowd which meant there was a good atmosphere. Racers Guild has another race at Stile Cop planned for the autumn and I hope I can go because it was a great day out!
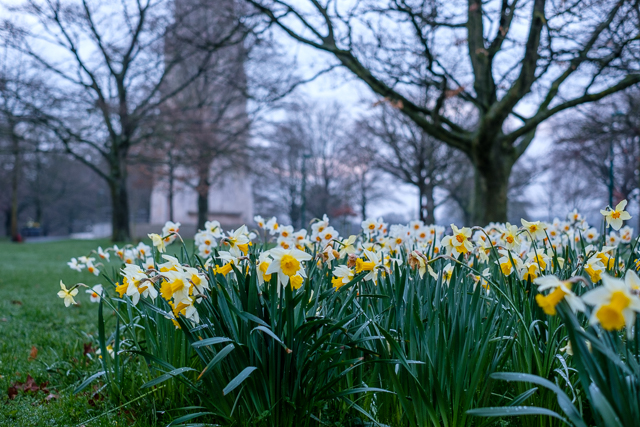
I am not a morning person, or should I say, I am not a getting-out-of-bed person. On the rare occasion, I do get up early, I love it. And today was one of those days. The Coventry Photography Meetup group had arranged a sunrise photo walk in the War Memorial Park – starting at 6:00, and as the forecast was due to be nice first thing, I set my alarm clock and joined them. Unfortunately, the weather forecast lied – it was a grey morning, but not quite misty enough to be atmospheric.
The first frame I took was of these daffodils in front of the war memorial, the flowers added a well-needed splash of colour. Moving down towards the skatepark, I switched to my 55-200mm lens, as there are usually plenty of squirrels there. I got a few photos of them, but 200mm is not really long enough for wildlife photography – I feel like it is a good jack-of-all-trades lens, but not really great at anything.
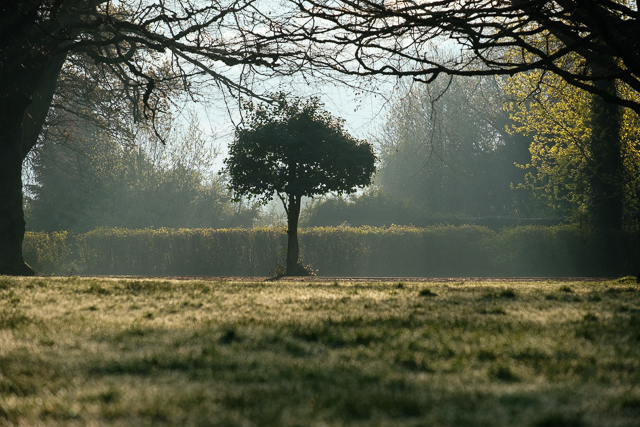
However, when the sun eventually popped out from behind the clouds, my eyes were drawn to the backlit tree at the edge of the park, and the 55-200 was definitely the right lens for the job. To make the image I knew I would just have to wait for someone to walk (or ideally ride their bike!) along the path into the frame. Even better was a jogger, his visible breath showing how cold it was, adding to the story. I knew straight away that this would be my favourite shot of the day (and is the shot at the top of this post). A few minutes later a cyclist rode past but the light had already gone.
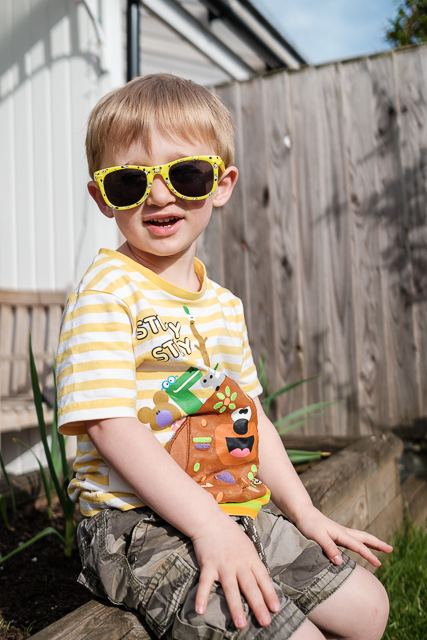
I borrowed a Fuji X100V over the Easter weekend, and this was my favourite photo of the weekend, and also my favourite photo of Henry from 2022 – and there were a lot of choose from! I feel like it captures his personality well – he always wants to be dressing up, in this case Jen’s sunglasses from when she was a little girl.
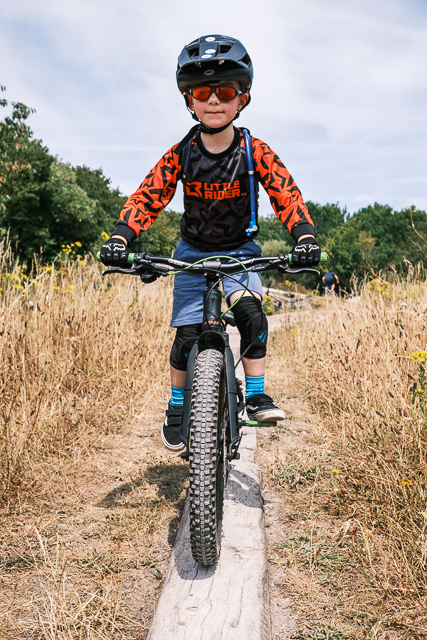
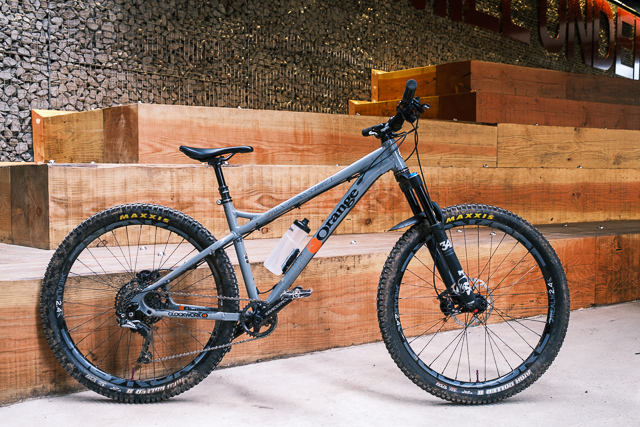
After trying out the X100V, it did not take me long to buy one – the main reason being that I can easily fiti it into my regular hydration pack to bring along on bike rides. It came along with Owen and I when we hit two trail centres on the hottest day of the year. I love the colours on this photo, applying the Fuji “Classic Neg” profile to the raw file faded the background greens and blues out and made the orange on Owen’s jersey pop. The photo also reminds me of a great day out with Owen, and has probably been my most shared photo of the year.
Another great day out was when I photographed the British Downhill Series mountain bike race in Wales. This photo of Ethan Craik (no relation) was my faviourite of the day, as he was on a different line to everyone else (riders right, down the grass). Unfortunately he had a crash further down the track, which was a shame, as he was on course to set a good time. I was pleased to see him placed seventh is the Canadian MTB World Cup round later in the year.
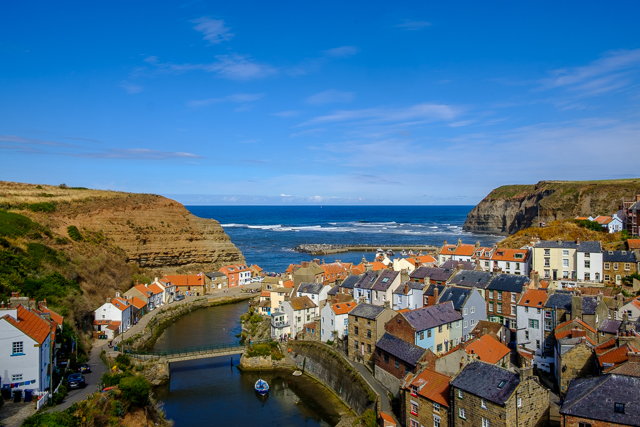
We had a good trip to Staithes in North Yorkshire, staying in our friend’s holiday house – I really need to finish my blog post about it! This is the quintesential Staithes photo, taken from the viewpoint on Cowbar headland. I had taken the same photo earlier in the week, on my X100V, but I felt like the light was better on this one, which was taken on my Fuji X-T2.
Another from the Easter weekend, with the X100V, but everyone loves a sausage dog. This was particularly evident as Partho, Otto and I walked around Birmingham, we had to stop every few minutes as someone wanted to fuss over Otto. This was another photo that brings back memories of a good day. And if you thought Otto is cute – later in the year he got a little brother, Leo. The boys love Partho’s dogs and we spent a lot of time with them in 2022.
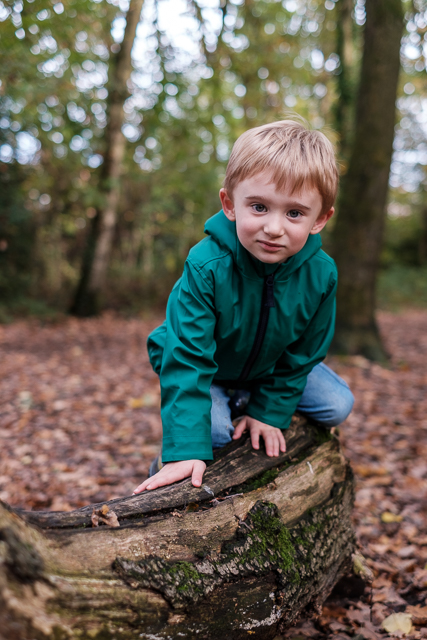
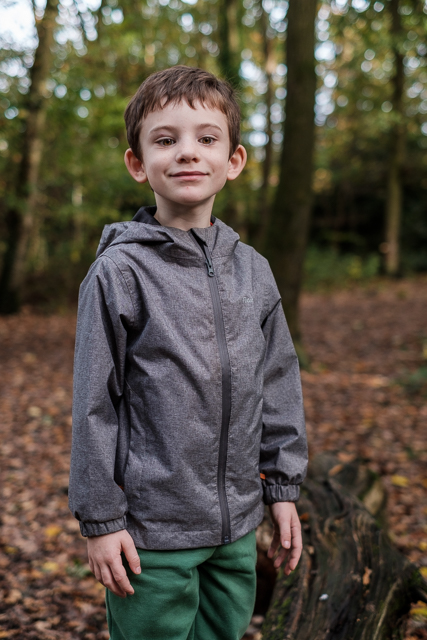
We are lucky enough to have some woods at the top of our road, and regularly head up there for a walk – as we did today. I decided to fit my Fuji 35mm f1.4 lens to my X-T2, not a combination I would usually take on one of these walks, as the autofocus is too slow to capture the boys running around. However, I am really pleased with these photos, and am not sure I would have got these with any of my other lenses.
After barely leaving the house the last few days, it was great to get out into the woods. The boys had fun climbing trees, and I even managed to get them to pose for me. On our way back, we met up with Jen on her way back from the hairdresser. It was a lovely way to spend an autumnal afternoon.
Part of the reason I switched camera systems to Fuji back in 2018 was that I wanted a smaller set-up. I thought I had achieved this when I bought the 23mm f2 Fujicron lens. I loved the quality of the lens and found I used it more than the 18-55mm “kit” lens and the 35mm full-frame equivalent quickly became my favourite focal length. However, it was still a “camera bag” camera, rather than a “pocket” camera, which meant I was not taking out as much as would have liked, especially on bike rides. This planted the seed in my mind about getting a Fuji X100V camera (Amazon affiliate link) and seeing the size comparison on camerasize.com convinced me – the camera with lens is smaller than my X-T2 and 23mm f2 lens. To make sure it would be the right decision, I used Fuji UK’s free loan service to borrow one for a weekend. To maximise the loan period I borrowed it over the Easter weekend, meaning I got a four-day loan, instead of two, Fuji also sent the camera a day early, so I had it for even longer.
My first trip out with it was for a bike ride and some street photography in Coventry city centre. I used it an excuse to check out the new Nauls Mill linear park, which is a nice way into the city centre – hopefully they will do a similar job at Spon End, which is our usual route. Photographically the trip was not that successful, but the camera was great – so small and discreet. I just needed to work on my street photography courage. I did get a nice bike portrait though in the revamped tunnel under the ringroad.
On the Saturday, I met my friend Partho, and his trusty hound Otto, for a photo walk around Birmingham. It was liberating only walking around with a tiny camera and as Partho also shoots Fuji I was able to lend him my 23mm f2 lens. As usual, Otto stole the show, we had to keep stopping for people to fuss over him.
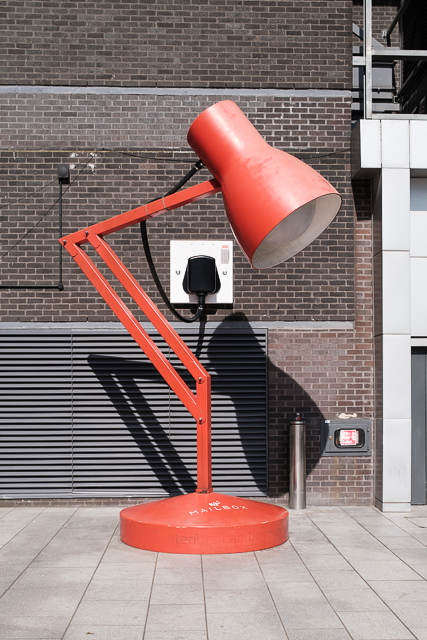
I felt like I was getting more confident with street photography, the little X100v certainly helped – I can see why they are so popular. However, my favourite photo from the walk was this lamp. There was so much more to explore in Birmingham, so in the future, I will try to fit in some evening photo walks after I finish work on my office days in Birmingham.
In addition to specific photography excursions I also wanted to see how the X100v fitted into my life as a dad – it had to be good for taking photos of the boys! Of course, it was! The picture quality is better than my X-T2/23mm f2 lens combination, the autofocus is more reliable and it is such a small and portable package. When I am about and about with the boys I can just shove it in a pocket when I need to attend to a little fall or snack request etc. The photo of Henry at the top of this post is one of my favourite photos of the year so far.
The only problem with the X100v is that I cannot buy one anywhere! After trying it out, I had decided I would buy it as a reward for passing my next AWS certification exam (which I hope to take in the next few weeks), but I think that if I find one in stock I just need to buy it! I have alerts set up in loads of places and I am top of the list for one at my local camera shop. It would be great to have it for some trips we have got planned over the summer.
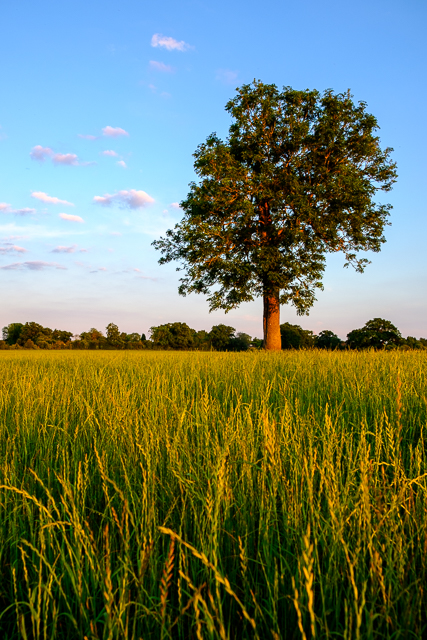
Yesterday was the summer solstice – so I decided to go out for a walk with my camera, with a vague idea of capturing the sun going down for the shortest night. I was walking between Coventry and Balsall Common and could not find an interesting view to the west. However, I did like this shot of a lone tree in the golden light.
Usually, on a warm summer evening, I would be out on my bike, but with my knee still not right after my ride to Hatton, I have been enjoying getting out for walks with my camera instead.
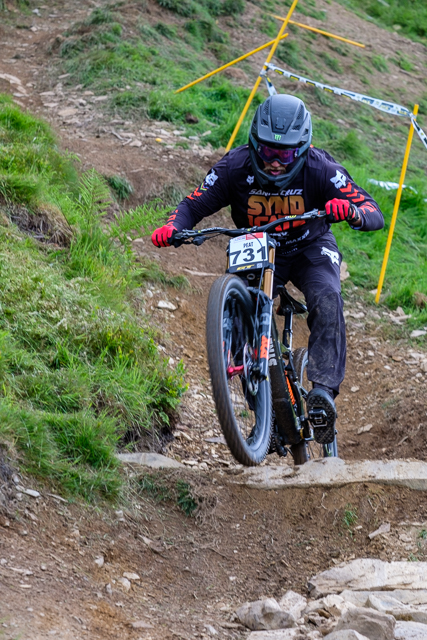
Last weekend I successfully managed to combine my interests in mountain biking and photography with a drive out in my MR2 – the third round of the 2022 British Downhill Series was in Llangollen and I drove over to spectate/photograph.
I started early, and rather than going straight to the race I drove past Llandegla and over the Horseshoe Pass to Llangollen, stopping for breakfast at the Ponderosa Cafe at the top of the pass. Most of the other customers were motorcyclists, but the breakfast was good (and sensibly priced) – somewhere I will be returning to! After breakfast I called in to the Oggie Shop in Llangollen to pick up some Oggies to take home. Oggies are like Cornish pasties, except the filling is organised in layers, rather than mixed together. For over twenty years I have associated Llangollen with Oggies, because of the Oggies Shop, so could not pass without stopping.
When I got to the race I did not know what to expect – would there be five spectators? Or five thousand? it seemed fairly busy, with spectators lining the whole track, but not such that it felt crowded. Spectators could walk up one side of the track, but it was steep and rough! Walking back down the hill at the end of the day, it was actually easier to walk down the track. Whilst the riders were doing their seeding runs, I walked the length of the track and scoped out a few viewpoints to shoot from. I settled on a series of tricky corners towards the top of the track to watch the race runs.
The timing of the race was such that the junior categories came down first, with each category getting faster and watching all of the race runs from the same allowed me to see just how much faster the elite men were. A lot of riders in the lower categories were struggling with the loose, blown-out corners, with some pretty spectacular crashes. However, the top elite riders made it look so easy, I was particularly impressed with Ethan Craik”s (no relation!) sneaky line down the grass, although he crashed later in his run, missing out on what was likely a podium spot.
For me, a real highlight was seeing Steve Peat, a true legend of the sport, returning to racing. He was in the “veterans” class but still put in a good time. It was a good day for his Santa Cruz Syndicate team, as Laurie Greenland won the elite class, setting the fastest time of the day.
Photography-wise, I loved being back out shooting sport, especially as access was much better than when I used to shoot motorsport. However, I did miss my old kit – the autofocus on my Fuji X-T2 and XF-55-200 lens, is no match for my old Canon 1Dmk2 and 70-200f2.8 lens, and I lost quite a few shots dues to them being out of focus. I also found out that one of my batteries has died. I think that there will be some changes in my camera bag in the coming months, as I definitely want to do more MTB race photography going forwards.
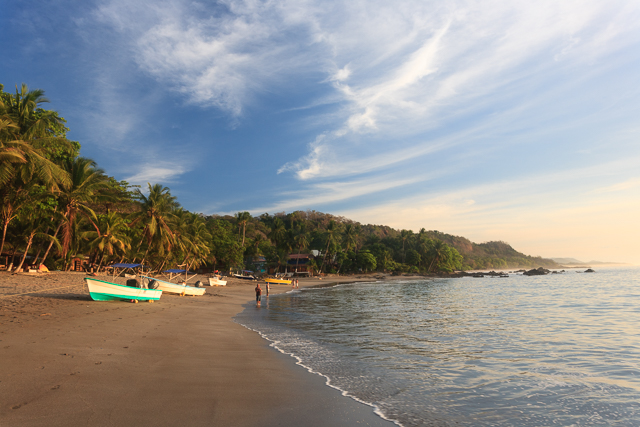
This photo, taken when we visited Montezuma in Costa Rica (ten years ago!), recently won third place in a “seascape” themed photography competition. So I took it as a good excuse to share it (again) on my blog.
It is crazy to think how much our lives have changed since we went to Costa Rica – shortly afterwards Jen and I started renovating the house where we now live with our two boys. And I have not been abroad for over three years, nor do we even have any foreign travel plans for the foreseeable future. Although it would be nice to take the boys over to Costa Rica…
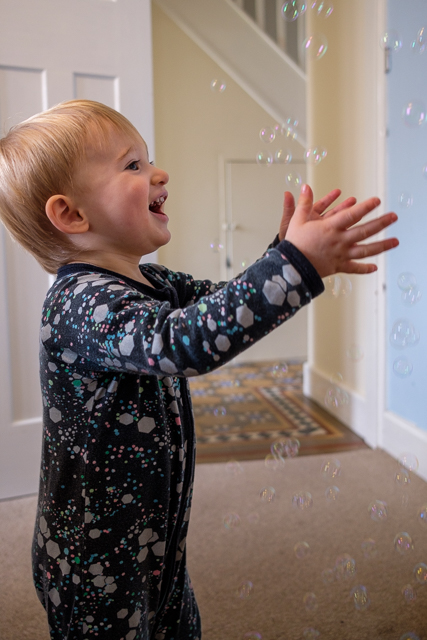
Henry got a bubble machine for his second birthday, in March, and although not technically perfect, I love this photo of him experiencing it for the first time. He looks so babyish compared to the proper little boy that he is now, eleven months later.
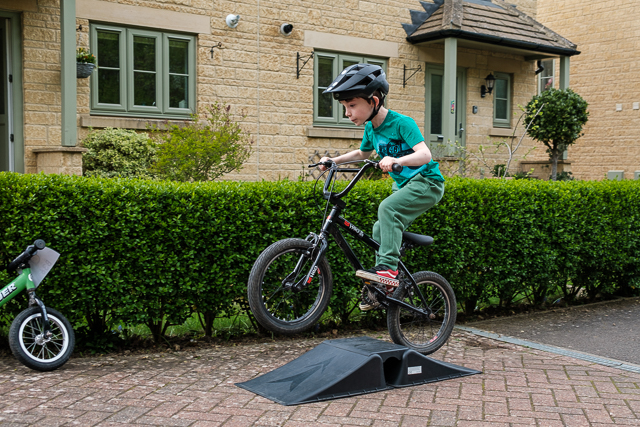
Another shot from earlier in the year. Owen and I had a week of bikes during the Easter holidays. This was a lucky shot whilst Owen was riding the skatepark, but I really like the colours. It was my phone home screen for a while too.
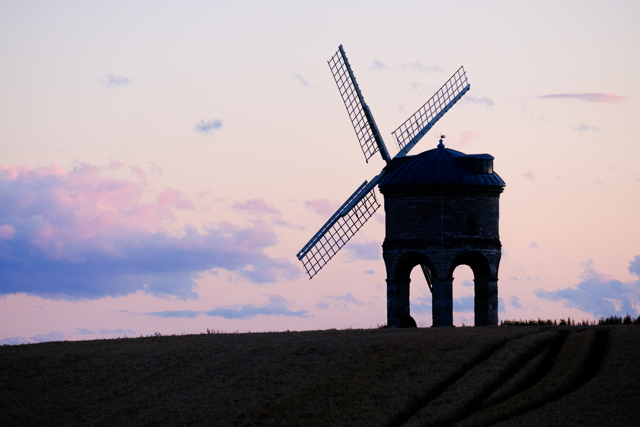
Chesterton Windmill is a bit of a cliche for photographers in Coventry, however, I was yet to visit with the camera. I had planned a silhouette shot backlit by the sunset, but this shot was from an initial scouting trip, one summer evening when I just needed to get out of the house. I am sure that the sun would be better positioned for a dramatic sunset in winter, but the sails were removed for maintenance in the autumn, so I will have to try again another year.
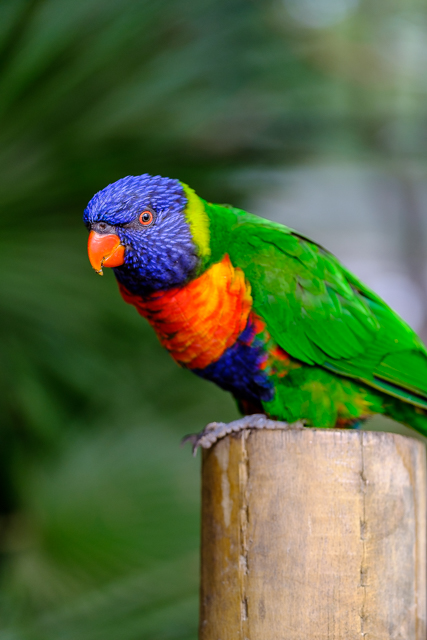
I love the colours of this lorikeet from one of our many visits to Twycross Zoo. I am especially impressed as I was with both of the boys at the time and this was a quick shot.